| Author |
|
Pavel
Matrosen-Stabsgefreiter

Joined: 12 February 2007
Location: Canada
Online Status: Offline
Posts: 121
|
| Posted: 03 January 2008 at 22:49 | IP Logged
|
|
|
A combination of gel and styrofoam may be useful, using the gel to accent the top of the spout (I imagine that would be a difficult piece of carving) and perhaps around the base of the spout as well, which may help hold the effect in place.
|
| Back to Top |


|
| |
dbauer
Bootsmannmaat


Joined: 15 November 2006
Location: United States
Online Status: Offline
Posts: 280
|
| Posted: 03 January 2008 at 23:57 | IP Logged
|
|
|
 Hi Pavel! Hi Pavel!
That is a wonderful idea! I will try that. This is the first time I have tried to do anything like this. I have not done a diorama in a long time. So all the help I can get is wonderful!
Thanks Again!
Regards,
__________________
Dan Bauer
Semper Fi
|
| Back to Top |


|
| |
dbauer
Bootsmannmaat


Joined: 15 November 2006
Location: United States
Online Status: Offline
Posts: 280
|
| Posted: 08 January 2008 at 15:27 | IP Logged
|
|
|
 Hello Again ! Hello Again !
Progress Report "Alarm!" Diorama.
I now have the U-452 completed and ready to shoot some paint. I will start with a dunkelgrau deck, then a schiffsbodenfarbe III grau I lower hull, and finally a dunkelgrau 51 upper hull and tower. I am waiting for paint and cockpit details from WEM for the PBY-2. I have removed all the control surfaces from the PBY and am detailing them. They will be placed in the corrected positions to give the PBY-2 the sense of flight. I also have finished the large base for the diorama and it is ready for the U-Boot and water.
More to come.....
Edited by dbauer on 08 January 2008 at 15:27
__________________
Dan Bauer
Semper Fi
|
| Back to Top |


|
| |
dbauer
Bootsmannmaat


Joined: 15 November 2006
Location: United States
Online Status: Offline
Posts: 280
|
| Posted: 09 January 2008 at 17:01 | IP Logged
|
|
|
 Hello All! Hello All!
Another Progress Report :
I am now shooting the paint on the U-452. As per the only pic I have, I seem to note the line of the darker lower hull and upper hull is below the second set of drain holes on the hull; with the saddle tanks painted all the lower Grau III colour. I am also working on the cockpit detail adding all the bits and pieces inside the British PBY-2 now. So far so good....
More to come.....
__________________
Dan Bauer
Semper Fi
|
| Back to Top |


|
| |
dbauer
Bootsmannmaat


Joined: 15 November 2006
Location: United States
Online Status: Offline
Posts: 280
|
| Posted: 16 January 2008 at 17:42 | IP Logged
|
|
|
 Hello All! Hello All!
I now have the interior of the PBY-2 done. I have painted the interior and have put the two halves together. I have also installed the wing assembly. This is a big plane ! I am now filling in some seams on the halves of the plane. I have also installed the support into the largest water spout for the wing of the PBY-2. I have also sent some pics of my finished U-47, and some pics of this project to Dougie. I am hoping he will be able to attach them to this fourm for all to see. Good luck Dougie!
So far so good...
Best Regards to All!
__________________
Dan Bauer
Semper Fi
|
| Back to Top |


|
| |
dbauer
Bootsmannmaat


Joined: 15 November 2006
Location: United States
Online Status: Offline
Posts: 280
|
| Posted: 18 January 2008 at 00:04 | IP Logged
|
|
|
 Hello Again! Hello Again!
I now have the PBY-2 ready for paint. In fact, I have sprayed a metal undercoat on the PBY-2 to simulate the metal undercoat of the plane. I will then chip away areas of the painted plane to show this undercoat as the real plane. Now I am ready to paint the three base colours on the PBY-2. I will begin working on the gel medium sea for the base.
More to come.....
__________________
Dan Bauer
Semper Fi
|
| Back to Top |


|
| |
Dougie
Matrosen-Obergefreiter

Joined: 29 September 2004
Location: United Kingdom
Online Status: Offline
Posts: 57
|
| Posted: 18 January 2008 at 21:03 | IP Logged
|
|
|
Hi Dan,
Sorry for my tardiness, have been having some computer problems.
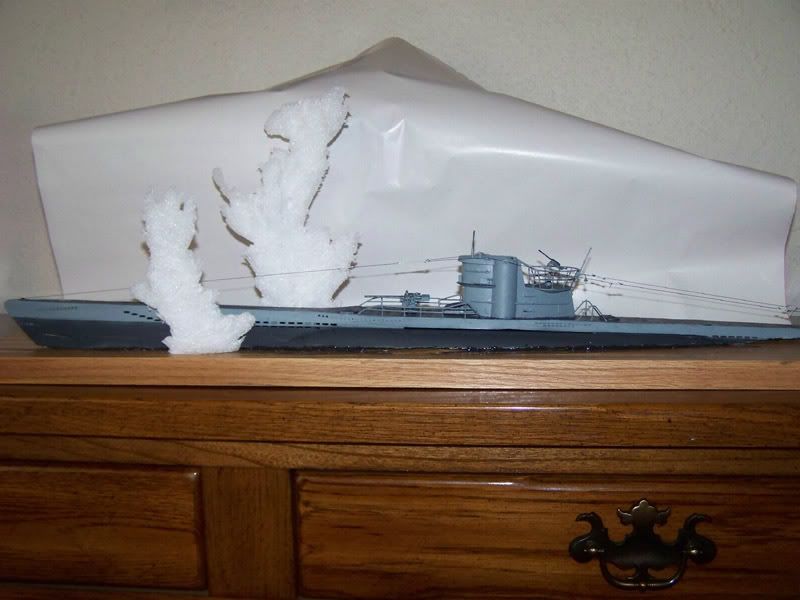
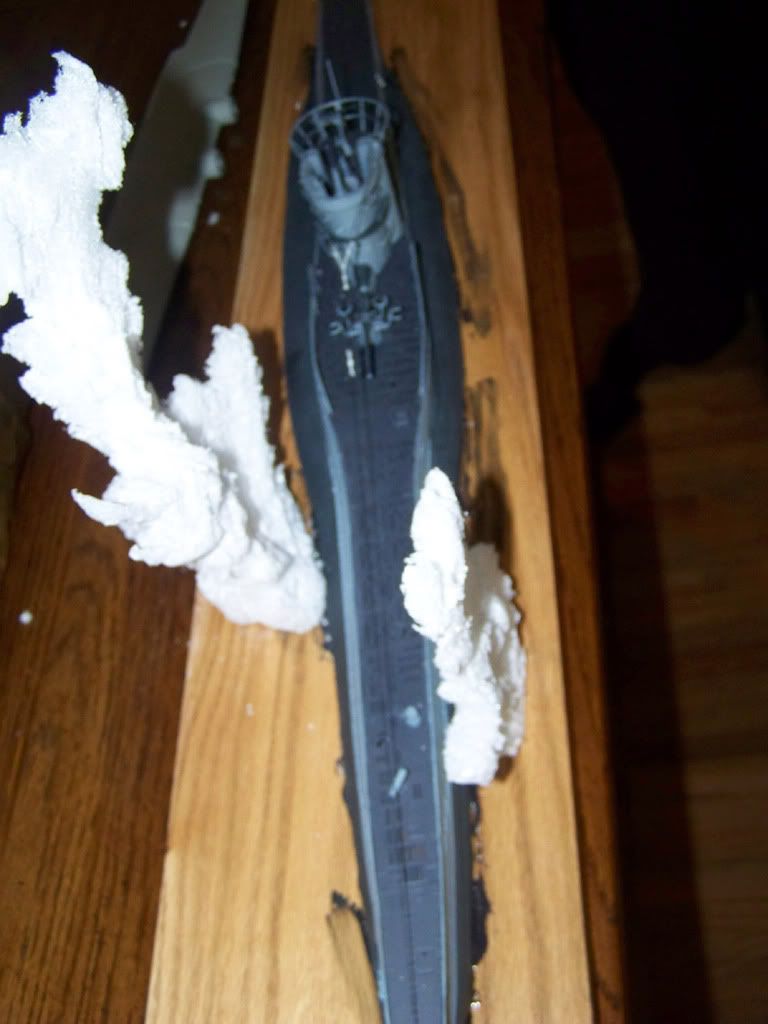
I've loaded your 4 images to Photobucket. Here are your 2 U 452 images -


They really do look outstanding. I love the water spouts! Also like the
way it is sitting in the water. Did you have much bother cutting the
lower half of the hull parts off?
Maybe you could do a build article for somewhere? Or maybe have photos of the completed model on the Hyperscale gallery?
Good luck with the Catalina, and thanks for sharing your photos.
Cheers,
Dougie
PS I'll post your 2 U 47 model photos on another thread now.
|
| Back to Top |


|
| |
Pavel
Matrosen-Stabsgefreiter

Joined: 12 February 2007
Location: Canada
Online Status: Offline
Posts: 121
|
| Posted: 18 January 2008 at 21:18 | IP Logged
|
|
|
Oh yeah, she's looking stunning so far. The attitude of the boat in the water is excellent - rocking from the first blasts and about to heel to the second. Will you have a watch crew / FlaK crew up, or will they be belowdecks trying to crashdive U-452?
|
| Back to Top |


|
| |
dbauer
Bootsmannmaat


Joined: 15 November 2006
Location: United States
Online Status: Offline
Posts: 280
|
| Posted: 20 January 2008 at 01:32 | IP Logged
|
|
|
 Hello to All! Hello to All!
Thanks Dougie for posting the shots for me. I have done more work since these photos. The U-Boot is now detailed and a wash of black was used to bring out the detailing. I have now painted on the gel medium for the ocean water. I had to do this twice to get the wave action I wanted around the Boot as I want to show it surfacing in a hurry. I also want to place the flak crew trying to get to their 2cm Flak. The PBY will be placed on the tallest water spout at an angle showing it coming over the Boot at the end of an attack dive. Thanks Pavel for the comments. You are good to see the angle of the U-Boot as it rocked from the blasts!! 
__________________
Dan Bauer
Semper Fi
|
| Back to Top |


|
| |
dbauer
Bootsmannmaat


Joined: 15 November 2006
Location: United States
Online Status: Offline
Posts: 280
|
| Posted: 23 January 2008 at 01:49 | IP Logged
|
|
|
 Hello to All! Hello to All!
I now have the base colours on the PBY and have test fited the plane to the
water spout. I have also set the British decals on. I have also started the
weathering.
I need to finish painting the water on the base and finish the U -boot. I
need to set an radar pole. I also need to place the guide wires on the deck
railings. So I hope to have this diorama finished by this weekend. I need to
have this done show it will be ready for it's first show in February.
More to Come!
Regards!
__________________
Dan Bauer
Semper Fi
|
| Back to Top |


|
| |

 Active Topics
  Memberlist
  Search
 Topic: "Alarm!!!" U-452/ Brit. Catalina Diorama (


